by jasonramey
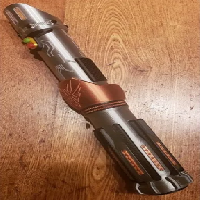
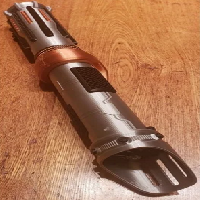
This is a custom lightsaber handle that I designed for a friend. It measures about 13" long. I took design cues from the classic Skywalker lightsaber but added my own twist to it. I tried to make it look like an actual electro-mechanical device with the heat sinks/vents, circuitry on the upper handle, and fan blades at the emitter end.
For assembly, you'll need the following:
a couple small tubes of super glue
the double button variant of this thing here
the belt clip assembly from this thing here
Print out one of each part except for the following:
6 emitter_bolt
2 heat_sink_backing
2 heat_sink
2 heat_sink_screen
3 handle_washer_1
2 handle_washer_2
7 handle_grip_strip
Note: on the handle_ring piece, there is no symbol on that piece. The printed piece in the pictures was a one-off custom piece for a friend and isn't in the final STL.
Assembly
Upper handle
Glue the emitter_heat_sink into the end of the emitter_shroud and glue the 6 emitter_bolts into the holes around emitter_shroud. Glue the shroud onto the top end of handle_upper (the oval hole for the button is toward the top). The tall part of the shroud should be in line with the oval button hole.
Glue a double button assembly (link in description above) into the oval hole. emitter_collar will go around the button and the wide end will butt up against the bottom of the emitter.
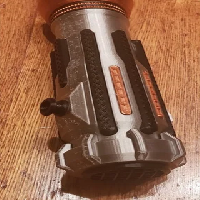
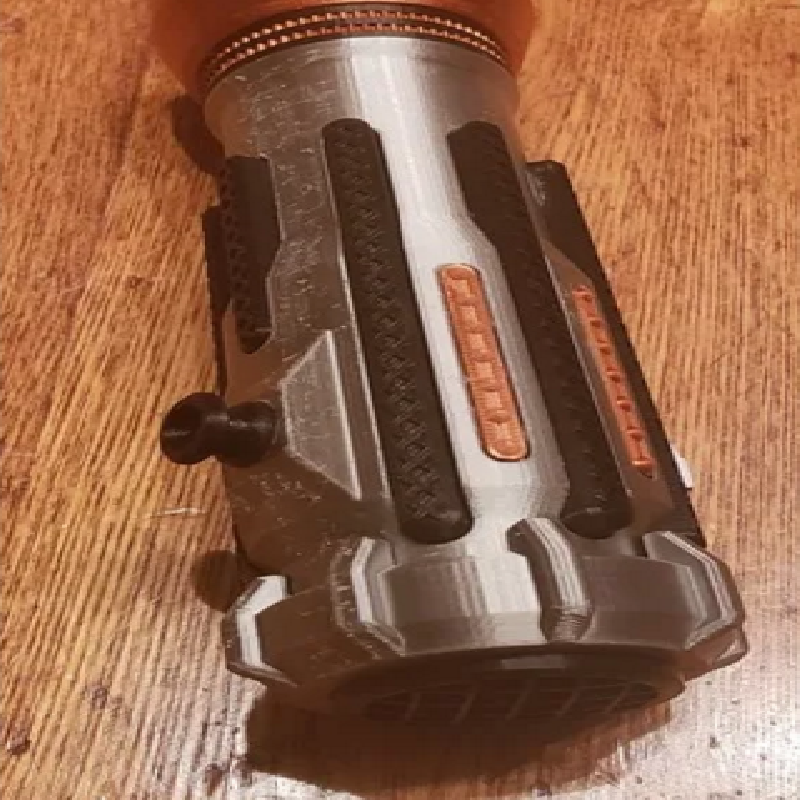
In the rectangular holes on the side of handle_upper, insert heat_sink_backing first (bumps/slots outward), then heat_sink, then heat_sink_screen last.
Lower handle
There are 8 wide slots on handle_lower but one is shorter than the other 7. Glue the 7 handle_grip_strips into the long slots on handle_lower. Glue the shorter handle_grip_strip_short onto the remaining short slot. The 6 handle_lower_slats will go in the slots in between.
Glue the pommel with the pointy protrusions pointing toward the bulk of the handle and rotated so the protrusions are centered in between the grip strips.
The pieces for the pommel heat sink will be inserted into the open end of the pommel in this order:pommel_heat_sink_backing, pommel_heat_sink, pommel_heat_sink_screen (with the round side facing outward). The screen piece doesn't really snap into place, so you'll just have to hold it firm and square as the glue sets.
Final assembly
Slide handle_ring onto the bottom of handle_upper with the tall side upward. The tall side of the ring should be in line with the buttons and the tall part of the emitter.
Slide the rings onto the top end of handle_lower alternating between handle_washer_1 andhandle_washer_2. Then slide the upper assembly onto the lower. There's a protrusion on the lower which should face to the left. This protrusion is where the belt clip knob will go.
Print Settings
Printer brand:
Creality
Printer:
Ender 3 Pro
Rafts:
No
Supports:
No
Resolution:
0.08
Infill:
10%
Filament_brand:
Mika3D
Filament_color:
various
Filament_material:
PLA
Notes:
I used the following colors: * silver - emitter, handle lower and upper, pommel * black - head sink screens, emitter heat sink, heat sink backings, emitter bolt heads, grip strips * copper - handle ring, handle washers, lower grip slats, heat sink fins * gold - button housing * translucent green - button * translucent red - other button The metallic filaments were from Mika3D, but the others were various brands.